Over a year ago, I modeled (on computer) the V&T's Flanger #52. While a plow gets the snow off the track, a "flanger" gets the ice off the railhead and on the inside where the wheel flanges ride. If that ice isn't removed, the wheels could ride up on it, and plop over and off the rails.
![Image]()
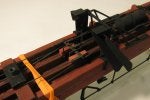
The rotating red target on top tells the engineer if the blades are down. The flanger was driven in front of a specially-equipped loco, and operated by a single dedicated air valve in the cab.
![Image]()
It took quite a lot of what-if modeling with the computer and emails with a V&T historian and others to figure out how the mechanism worked. That was fun because the computer model helped clear up a couple of puzzles. And, I love the historical research part.
Here's a short animation or two that give an idea. The black double-bar that folds down at the end is a locking device that safely holds the blades up. If the blades were lowered while, say, running through a switch, it could tear the frog & inner rails up.
I designed around Bachmann trucks, brass rod and a body built from scratch out of cedar strips.
![Image]()
Shapeways printed the "metal" bits out of black nylon.
![Image]()
![Image]()
Over the holidays I finally got a start, and cut all the wood and brass.
![Image]()
Last weekend I was able to get going on assembly of the main car, which has a lower and upper deck. The prototype was weighted with rail in between these decks, but mine is weighted with 1/4" x 1-1/4" flat bar.
![Image]()
![Image]()
Jerry (Naptowneng) has been helping me think through the painting process, and here is the car with 1 diluted wash coat of Tuscan Red acrylic. That's the best choice, per the historian. This paint came in a 2 oz bottle from Walmart, for 50 cents (yes, in Tuscan Red)!
![Image]()
I've darkened it up since with a 2nd wash coat. Next will be some slight weathering, though this needs look like it's in-service. Then the fun part, assembly of the "metal" bits.
For detailing, I started this project with the notion of doing an entirely 3D-printed set of plastic parts (in addition to the commercial items and stock that I mentioned earlier). I didn't bother with small details such as nut-washer items, because those would be tough to individually 3D print. But now that I've gotten into this (my first scratch build), little bits like that are on their way from Ozark, which will be a lot of fun to play with.
One more detail thing to mention. If you look closely at the trucks (in the first pic), you'll see there's no springs. This was because (and I've confirmed this with those who know best) it was vital to have the blade properly distanced from the rail surfaces. And not bouncing on the rails, and gouging them. So, in place of the springs, they installed blocks of wood. Here's a higher res shot.
http://unrspecoll.pastperfectonline.com/photo/187F9058-45CA-4F10-8FD6-794825814425
I'll probably 3D print or carve these blocks, and glue them to the BM spring cavities.
===>Cliffy
The rotating red target on top tells the engineer if the blades are down. The flanger was driven in front of a specially-equipped loco, and operated by a single dedicated air valve in the cab.
It took quite a lot of what-if modeling with the computer and emails with a V&T historian and others to figure out how the mechanism worked. That was fun because the computer model helped clear up a couple of puzzles. And, I love the historical research part.
Here's a short animation or two that give an idea. The black double-bar that folds down at the end is a locking device that safely holds the blades up. If the blades were lowered while, say, running through a switch, it could tear the frog & inner rails up.
I designed around Bachmann trucks, brass rod and a body built from scratch out of cedar strips.
Shapeways printed the "metal" bits out of black nylon.
Over the holidays I finally got a start, and cut all the wood and brass.
Last weekend I was able to get going on assembly of the main car, which has a lower and upper deck. The prototype was weighted with rail in between these decks, but mine is weighted with 1/4" x 1-1/4" flat bar.
Jerry (Naptowneng) has been helping me think through the painting process, and here is the car with 1 diluted wash coat of Tuscan Red acrylic. That's the best choice, per the historian. This paint came in a 2 oz bottle from Walmart, for 50 cents (yes, in Tuscan Red)!
I've darkened it up since with a 2nd wash coat. Next will be some slight weathering, though this needs look like it's in-service. Then the fun part, assembly of the "metal" bits.
For detailing, I started this project with the notion of doing an entirely 3D-printed set of plastic parts (in addition to the commercial items and stock that I mentioned earlier). I didn't bother with small details such as nut-washer items, because those would be tough to individually 3D print. But now that I've gotten into this (my first scratch build), little bits like that are on their way from Ozark, which will be a lot of fun to play with.
One more detail thing to mention. If you look closely at the trucks (in the first pic), you'll see there's no springs. This was because (and I've confirmed this with those who know best) it was vital to have the blade properly distanced from the rail surfaces. And not bouncing on the rails, and gouging them. So, in place of the springs, they installed blocks of wood. Here's a higher res shot.
http://unrspecoll.pastperfectonline.com/photo/187F9058-45CA-4F10-8FD6-794825814425
I'll probably 3D print or carve these blocks, and glue them to the BM spring cavities.
===>Cliffy