G Scale Model Train Forum banner
1 - 20 of 41 Posts

Mik

· Registered
Joined
·
2,814 Posts
Discussion starter · #1 ·
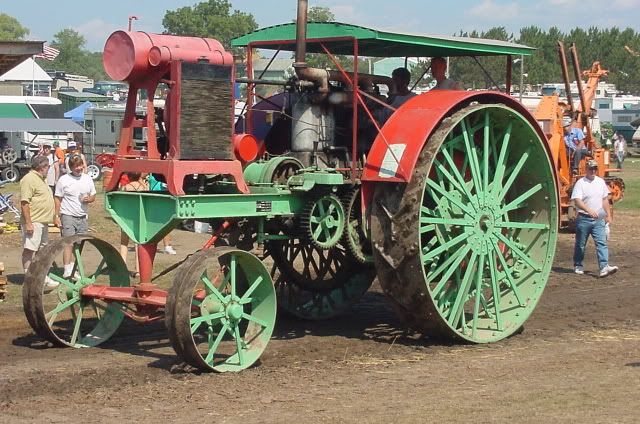
Since some of you fellows have shown such an interest in old farm tractors for your layouts. I dug up some pix and catalog cuts of a visually interesting, yet relatively simple one. It's of about WWI vintage (built from 1910-27), so it will work on most layouts, either new, in use, derelict in a hedgerow, or on a flatcar headed for the scrapyard.

I bring you the Flour City tractor, made by the Kinnard & Sons Mfg. Co. of Minneapolis, Minn.


Flour City tractors were made in 5 models in 4 sizes: I've included some dims from the catalog to help you scale the rest.....


The 12-24 Junior-
Image

Image

Image


Belt Pullley..................26 x 71/2 in
Front Wheels.............................. 38 x 5 in.
Traction Wheels...........60 in., Face (R-12 in., L-14 in.)
Length.........................................152 in.

Width..........................................84 in.
Wheel Base..................................92 in.
The 20-35 -
Image

Belt Pulley .............................................................................. 26 x 8
*Traction Wheels .................................................................... 6 ft. x 18 in.
Front Wheels .......................................................................... 42 x 8
Wheel Base ............................................................................ 9 ft.
Width Outside Trac. Wheels ................................................... 80 in.


The 30-50 -
Image

Belt Pulley .............................................................................. 32 x 9
*Traction Wheels ................................................................... 7 f t. x 24 in
Front Wheels ......................................................................... 48 x 9
Wheel Base ............................................................................ 11 ft.
Width Outside Trac. Wheels ................................................... 96 in.
The 40-70 -
Image

Image

Belt Pulley ............................................................................... 34 x 10
*Traction Wheels .................................................................... 8 ft. x 24 in.
Front Wheels .......................................................................... 48 x 10
Wheel Base ............................................................................ 13 ft. 6 in.
Width Outside Trac. Wheels ................................................... 111 in.
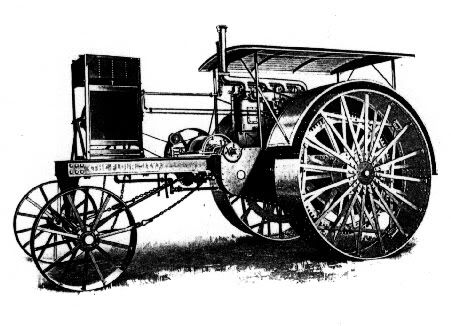
And the 40-70 special road tractor -
Image

Image

Image


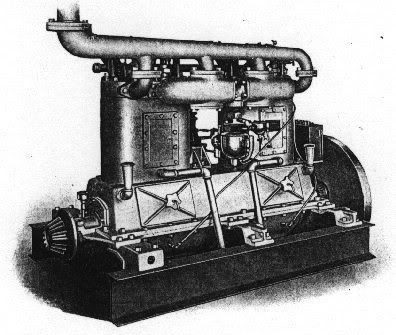
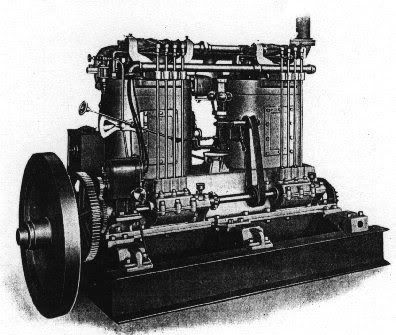
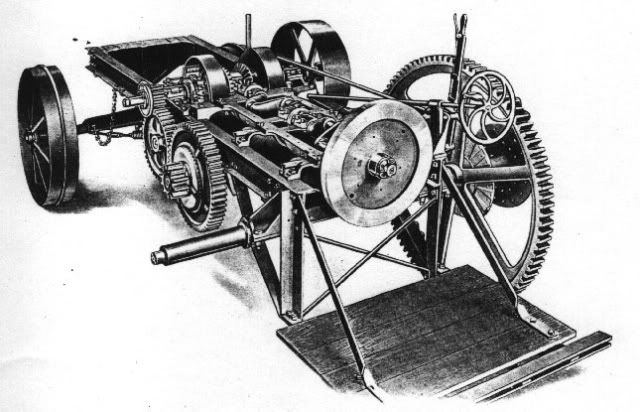
Okay, so now you're all saying 'simple?' It should be if you break it into steps. To help with that, here are some original 1919 catalog cuts to get us started:

engine bed with crank -

Image


engine cylinders and heads -

Image


Engine assembly -
Image


Image


Gearbox and frame layout -
Image


Image


Rear wheel with bull gear -

Image


Operator's platform -

Image

And some pix to show scale -

12-24 plowing

Image


30-50 threshing

Image


40-70 threshing
Image


40-70 with steam traction plow


Image


40-70 special with grader
Image

anybody up to the challenge? I have some ideas on how to build it. But feel free to share yours....
 
Discussion starter · #2 ·
Here are the "few ideas" I've thought of so far....

Wheels - pvc pipe rims (4" back, 2" front for the 40-70) with wooden spools for hubs and coffee stirrers for spokes. frost band and cleats from thin Evergreen styrene square stock. (The Y shape will need a jig, of course).

Fenders 1" wide styrene or brass.

platform popsicle sticks, coffee stirrers or birch plywood


Cylinders made from a pair of discarded butane lighters, mounted on a wood crankcase.

Ozark brake wheel for the steering wheel. Belt pulley off George Kester (Kester's Old-Tyme Collectibles) in Illinois, or Mamod.

Most of the frame could be built from styrene, or soldered up from brass.

Gears..... Ozark, LarryGScale, and/or an old clock????

Various tanks, wood dowels or Ozark air tanks.

The manifold, governor, carburetor and radiator base have me stumped for the moment....
 
Discussion starter · #4 ·
Some quick "guesstimates" based on the pix. Finished length of the 40-70 in 1:24 about 9-1/2", width 4-9/16", height 5-1/2" to the top of the canopy. If you're in 1:20.3 this would be about right for the 30-50

Main sills would be 5/16" I beam +/- 7.25" long.
rear wheel rims 4" x 1"
front wheels 2" x 1/2" (close enough)
Belt Pulley 1-1/2" x 1/2"
The operator's platform +/- 2" x 2"
 
Discussion starter · #5 ·
I found these little wooden washboard ornament thingies in the craft section at the local junk shop today. I think they'll make for dandy radiator fronts. I also purchased the pvc (white) pipe of the proper sizes for the wheels, but I had to buy enough for about TEN tractors, though (2 feet of each size). If anyone plans to build along and wants rims, wood spools for hubs, washboards and whatever else, please let me know.

I got some 1/4" Plastruct I beam for the main sills, since it was stiffer than the evergreen, and 3/32" Basswood for the spokes since it seems stiffer than similar sized styrene.


I THINK I found a pattern (brass clock gear) for the bull gears. Anyone up to casting a few in resin?


I'll probably have Stan Cedarleaf make up the lettering. (2 round heralds for the fenders, and 2 frame rail ones in yellow, and maybe the one on the front of the fender, if I can get a good scan) If anybody else wants some too, it will make mine cheaper, lol. I think I may have even managed to find a couple acrylic colors that should somewhat match the original, but have that old paint faded look..... Apple Barrel 'Green Clover', and Americana 'Country Red'. Debating between light grey and flat aluminum for the engine. Restored engine pics seem to show both.


AND, a fellow on another board HAS a Flour City and says he can help with detail pix and measurements if things get confusing. I think I'm gonna build 3, one to keep, the others to peddle and maybe raise money to buy even more junk, hehehe... Anybody else game?
 
Discussion starter · #7 ·
The 40-70 at Rollag Minnesota has a contractor's cab. The fellow keeping it from falling over really gives you a feel of size for those 8-foot wheels.
Image


A "baby" one, actually a very nice 1/3 scale model
Image


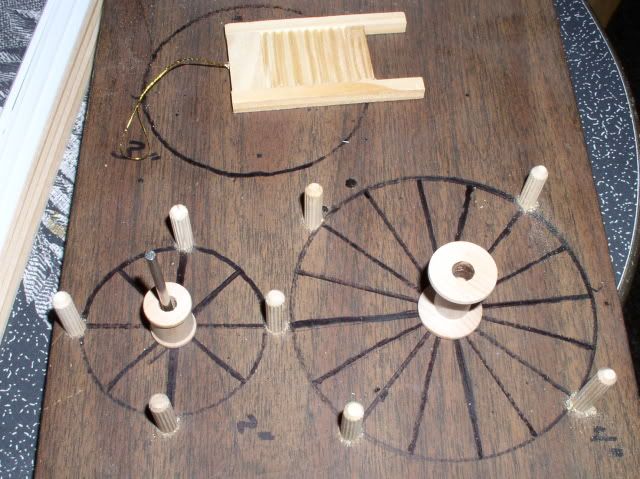
Mik's super-deluxe-custom-state-of-the-art-accept-no-substitutions-patent-pending (yeah, right...) Wheel jig. It is guarawnteeeeed accurate down to 1/64" (more or less, but it should be real close, the spoke spacings are right, and the radius measurements all match) ....unless you bump it, drop it, sneeze, hiccup, or otherwise knock the wedges loose. It took me a whole 20 minutes to throw together, lol. The funny square thing at the top of the pic is one of those washboards.
Image
 
Discussion starter · #8 ·
Hi, all. I was busy today, but still managed to get a bit done. I found a guy in Hong Kong who lists various parts for R/C cars and helos, who might have suitable bull gears, spur gears, pinions and bevel gears in nylon.... As soon as he gets back to me with dimensions, I'll have part numbers and prices for off the shelf parts... yay! (at a guess the various gears will run about $10-20 per tractor this way)

To help the fellows who have trouble visualizing in 3 dimensions, and guesstimating sizes, I made a thumbnail sketch of the sideframes this evening. I left it huge for legibility, so here's a link rather than a pic. http://i397.photobucket.com/albums/pp52/steamnut1917/flour%20city%20tractor/P5070001.jpg


Serious questions time. Is anybody even interested in building one along with me at all? Are you sitting on the fence waiting for me to figure out a bill of materials, price it out, provide drawings and basically prototype it? (I usually build without drawings, or only loosely follow them, so I need to know if I'll have to do quick sketches, or reverse engineer complete prints.) Of those who are thinking of building along, would you prefer to scrounge your own parts or for me source together a package of all the tough to find bits; wheel rims, gearing, small castings, springs, decals, etc.??? If I build 3 (and serial number them) does anybody too timid to build want the other two? (and at what price? $200 each?). Or do you guys think it's hideous or the wrong era?

I picked this particular tractor for the following reasons: 1. Simplicity - most of this it can be built without resorting to custom castings, or even access to a lathe. 2. Cool "industrial folk art"/ visually interesting cluttered look. 3. Rather attractive color scheme. 4. I had access to the catalog cuts and prototype pix. 5. Several models/sizes sharing the same basic layout. 6. Even though they were a fairly early model, many lasted as sawmill, etc power sources into the late 50's.

Feedback appreciated, thanks
 
Mik,

While I am not building one at the moment, I am quite interested in your progress. I'm watching the thread for two reasons. First, it's always fascinating to see a model being built. Second, I may decide that I need one in the future. So, please, continue to share updates with us.
 
Discussion starter · #10 ·
Sorry if I sounded crabby. During my gear search yesterday I ran into a BUNCH of not-so-helpful types. They list all these gears by application, saying "fits chassis xyz". So you ask them nicely to measure the diameter, the center hole and pitch of one or two, and get the response "They ONLY fit chassis xyz..."

I can't decide if the guys answering were too dumb to understand the question, too lazy to find a ruler, too arrogant to help (I should be BORN knowing all that, shouldn't I?) Asking them to think outside the box for a minute, or look up something that isn't already in their ad (or computer) is just SOOOOO unreasonable.... grrrr

Methinks it's MORE unreasonable to expect me to just buy a bunch of the stupid things not knowing if they will even work, or to visit their store (on the opposite coast) to check for myself. I suppose I should be expecting to get customer NOservice by now, but I still find it annoying as ****.
 
I have found that a lot of people (in any hobby or group) have absolutely no idea what they're doing. They know that Tab A fits into Slot B and everything works, but ask them to explain how or why, and you get a blank stare. Worse, you find that a lot of them are either unwilling or unable to comprehend why anybody would even WANT to understand how or why it works. I always find it amusing when such people describe themselves as experts, or experienced builders, or even claim to have made something themselves.

A skilled mechanic can assemble or disassemble almost anything, given the proper tools.

A skilled ENGINEER, or the other hand, can design and build almost anything, given the proper tools.
 
Discussion starter · #12 ·
Posted By DKRickman on 05/08/2009 11:25 AM
A skilled mechanic can assemble or disassemble almost anything, given the proper tools.

A skilled ENGINEER, or the other hand, can design and build almost anything, given the proper tools.


My grandfather and father were both pretty much self taught. A short list of the stuff that they cobbled together include several 1/3 scale hay presses, 5 model stationary steam engines (I have 2 of them), a 5/8 scale traction engine, a complete 15" gauge railroad, including the train, a sorghum press/harvester, two Baker fans, plus restoration of about 30 pieces of antique machinery, usually starting with a couple palettes of rusty parts.

The ONLY time I ever saw them use plans/drawings of ANY sort was the turnout frog and wing rails on the railroad... those were rough sketched in soapstone on the garage floor, everything else was in their heads.

Poor me, I grew up thinking that this kind of ability was "normal" (I can 'sorta' do it, but as a watchmaker, I'm a pretty fair blacksmith on a lot of things).... Then when I started selling model engineering stuff, I quickly found out that many people STILL have trouble figuring out what something is supposed to look like or go together, even with complete full sized prints and assembly drawings right in front of them! If America has lost her 'competitive edge', dya think this lack just MIGHT have something to do with it?


I'm still waiting to hear back from a couple other vendors on gears
 
Discussion starter · #13 ·
This morning Kim wanted to go flea-ing. So I finagled a side trip to the hobby shop in Murrysville, about an hour away, to look for gears. Found some nylon helo main rotor gears at $3.99 each to use for main gears. Pinions at $4.99/pair, and some intermediate gears for $2.49 each. I got enough for 3 tractors. Then I found some basswood with a nice profile for spokes, and grabbed about 40 feet of that. The total was $60-something. Then we stopped at an industrial/tool supply place and got a proper plastic pipe saw for $23. -- Good thing I'm doing this for "fun" and "edjumekayshun", rather than to "save" money....

I also decided I want to build a Frick portable sawmill (size 1 with a 28" top saw) to go with it, when it's done. -- And me still working on 4 other unfinished projects.... Can you say "glutton for punishment"? or is it just "dumbass"?

The good news is a fellow emailed me about 30 close-ups of the 40-70 he's restoring while we were gone. Stuff like motor mounts and crossmembers, and linkages that might come in handy soon.

Quick question, which version do you guys like better?

Image
Image
 
Mic, I'm interesred in the challange, with a few guidelines .

As much trouble as it may be will we get clearer pics/drawings? You pic out the parts or alternets and give a part #.I'd like to build one, but not being familiar with the equipment I'm sure it will take me a little longer to complete.I've got a few other items I need to get done first but a build log under the appropriate heading could be used in the near future and referred to as time permits. I really enjoyed following your sixty build and saved that and the cars for future builds.I would certainly like to do the same with this.

Dave
 
Discussion starter · #15 ·
I'll try to stop long enough to make sketches... or at least take pictures. Here are some of the ones the fellow sent me today. If nothing else, it shows how much WORK the restoration guys do.

Jr engine, from the platform
Image


Jr with Ham headlight
Image


Jr motor mounts and compensating gear
Image


40-70 rear view
Image


40-70 primary drive and clutches
Image


Image


Image


Image


front bolster casting
Image


front axle
Image


cooling piping left side of engine
Image


Engine right side
Image


Engine left side
Image


Camshaft gear
Image


Head with valves, guides, and rocker shafts
Image


governor and pushrods
Image


engine support crossmembers
Image


cylinder jug and head
Image


Platform frame
Image


reversing bar 'gear shifter'
Image


Time to go cut some spokes
 
Discussion starter · #16 ·
FIRST ACTUAL BUILD PHOTOS!!! Up till now, this project has all been 'just talk' (....and blowing money on pieces-parts).

So tonight I whacked some plastic, snipped and carved some wood, dabbed some glue and smeared some paint!

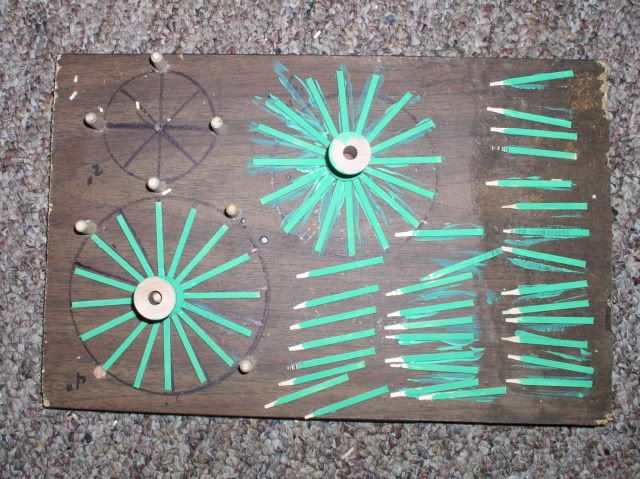
Spokes (2" long) cut and laid out on the jig. One little bobble and you have to reset half of them...
Image


Hub (7/8" wood spool) being glued to spokes (hint: put the glue on the spool and carefully lower onto the spokes) The first one is in the background.
Image


I decided to paint the inside parts now, because it will be a pain in the rump later...
Image


Rims and bull gears. The rims are cut from 4" pvc drain pipe. The gears are E-flite EFLH1453 Main Tail Drive Gear B400 ($3.99 ea). The design is all wrong, but the spoked gears the same size were $14 apiece!
Image


I'll let the glue and paint dry until morning before I try to assemble anything further.

Edit: one almost done, one with 2nd row of spokes drying. If this is the toughest part, it will be an (relatively) easy project (knock wood)

Image
 
Discussion starter · #17 ·
Today's progress, aka 'I wuz FRAMED!'

Plastruct I beam and angle sideframes as per above drawing.... remember to make them mirror image, lol. (5/16" I-beam 7-1/4" long, 3/16" angle 1-3/4" down, 2" platform based diagonal at 45 deg cut to fit)
Image


Front bolster. I used the corner off a broken plexiglas price number from work, a coffee stirrer, and a bit of balsa. Mine is 1-7/8" center to center on the sills. 1/8" nrrower would have been better) Styrene or even thin plywood would work. -- Hint, use the corner itself to form the diagonals, saves a LOT of layout time and cutting!. Yes, I fixed the drunk looking bits after the glue got tacky enough so that they'd stay put...
Image


More progress, the engine support crossmembers were from a set of junky 'o-scale' Lionel castings that I found at the hobby shop for $3.50... It also has pallets and 'spike kegs' that are quite usable in "G" (note there should be THREE engine crossmembers, not FOUR... too late to fix mine without major surgery!)
Image


Coffee stirrer platform ( they should overhang the angle irons by 1/8" or so on both sides) and hitch bracket. A smokejack from the Lionel castings for the front pedestal, and a first coat of paint... It's starting to look like SOMETHING, I think.....
Image
 
Discussion starter · #19 ·
Dave, The catalog cuts were courtesy of the gents in the Northwest Michigan show at Buckley, and were more than I had a right to expect. OTOH they were intended to help SELL the tractor design, not STEAL it. The pix of Mr Flatmoe's tractors were just icing on the cake as far as clarifying some niggling little details -- ones which I specifically ASKED him to show me. I'll send along your thanks as well ;)" align="absmiddle" border="0" />

The design of the throwout for the drive pinion is still kind of fuzzy to me. I'm sending a request for a pic of that. Anything else you're cornfuzled on?

As for "jackrabbit starts" it actually is so simple a design that it almost falls together.... I foodled with the frame between customers at work, and STILL had it done as far as the third pic in about 3 hours. You spend more time waiting on the glue to dry than working.

At the moment I'm idly wondering how hard it would be to install a small electric motor to turn the crankshaft (I'm not modeling the internals, I'm crazy, but not nuts), camshaft, and primary drive..... Nah, that would require an extra 4 hours work a N-scale sized motor, $6 in bevel gears, and?.... But..... Nah.... But.....Nah...But...
 
Mik,
I'm confuzled on the whole contraption part of it,that being said you've givin rough dimentions and your abilities at presentation of your subject are extremely helpful. So although I might have to eyeball from twenty feet when I'm finished my first tractor I hope to have something close to it looks like it could might be one of those I saw someplace "OH YEAYA ! That's a tractor!!! :>

Thanks for what your doing and I didn't really think you expected us to be able to build from the catalogue pics. Hope this is almost as easy as you describe.

Dave

No mine won't be motorized no matter what you do
 
1 - 20 of 41 Posts