The AM-2 (Articulated Mogul) Cab Forwards were used for both freight and passenger service beginning in 1927 as compound engines and were eventually converted ti simple in 1929 and renumbered to the 3900 series
My build is number 3900
![Image]()
I get my wheel castings from Walsall in GB but their web site has been blocked in the US from what they said is a virus threat. I was able to contact then via email and ordered 12 castings which came last week
![Image]()
The castings have a ridge which is very true and is where I start my turning process
![Image]()
The back is then turned till the spokes are exposed
![Image]()
The axle hole is center spotted, drilled out to 3/16" and then reamed to 5 mm
![Image]()
It is then mounted in an arbor and the front rim is turned to a 6 mm thickness
![Image]()
And the diameter is rough turned to shape. The final tread will be done with the plunge tool on Dennis' large lathe
The wheel is then mounted in the external chuck jaws and the center hub is turned to .280" thickness
![Image]()
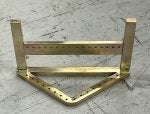
THIS IS A JIG I made for drilling the crank pin hole. I center spot it, drill to 3/32" and then tap to 4-40
![Image]()
The center drill is adjusted to meet the drilled hole in the jig and the DRO is centered. It is then mover to .3375" which is the radius of the crank pin
![Image]()
More to come
My build is number 3900
I get my wheel castings from Walsall in GB but their web site has been blocked in the US from what they said is a virus threat. I was able to contact then via email and ordered 12 castings which came last week
The castings have a ridge which is very true and is where I start my turning process
The back is then turned till the spokes are exposed
The axle hole is center spotted, drilled out to 3/16" and then reamed to 5 mm
It is then mounted in an arbor and the front rim is turned to a 6 mm thickness
And the diameter is rough turned to shape. The final tread will be done with the plunge tool on Dennis' large lathe
The wheel is then mounted in the external chuck jaws and the center hub is turned to .280" thickness
THIS IS A JIG I made for drilling the crank pin hole. I center spot it, drill to 3/32" and then tap to 4-40
The center drill is adjusted to meet the drilled hole in the jig and the DRO is centered. It is then mover to .3375" which is the radius of the crank pin
More to come